Thursday, May 30, 2013

Train Panel Quilt


My son is mildly obsessed with trains, so when he came with me to Spotlight at Everton Park to purchase some backing fabric (for different quilting project); I knew that I had to purchase this train quilt panel to suppress my guilt for yet again dragging my child to the fabric shop.

The train cot quilt panel was $15.00, so not such a bad deal.

 The trickiest part has been being mindful of when I want to work on it (often when he’s in bed asleep). As on one occasion I have had little hands trying to grab at it from under the sewing machine whilst I’m still working on it.


This isn’t such a huge project, but still I’m still glad to finally have it finished for my son to enjoy.

Of course now I wish I’d made it a single bed size instead of just cot size; as it would continue to be a more functional quilt, instead of just another play time blanket.

 The quilt measures 33.5 by 42.5 inches, or 86cms by 108.5cms. The backing is left over pirate/treasure fabric that I have previously made a library bag for my son with last year. (see blog post from Feb 2012) This fabric was originally earmarked to be the backing of my son's first single bed quilt (see blog post from April 2012), but last minute I decided upon using another fabric instead.


I’ve quilted a basic grid on the quilt in a blue cotton thread, before heavily quilting other random areas of the quilt, with colours that blend into that section.

 I have quilted the trees with green thread in random sewing style. It’s become more of a practical way for me to practise the quilting attachment for my machine more than anything. I’ve also quilted the trains and some of the carriages.

 I was originally going to continue quilting this one until I’d used a range of different coloured threads and sections on the quilt. But I did have a very impatient little boy asking me when I would be finished with his quilt as he needed his new train ‘blankie’.


The wadding is bamboo. I think I’ll always end up using in every quilt that I make from now on as it’s the ultimate in wadding. It’s a renewable resource, it’s hot or cold when you want/need it to be and it’s just so amazingly easy to quilt with.

To make the quilt sandwich I’ve used my favourite tried and tested method of spraying the 501 spray and smoothing the fabric on to the wadding. I’ve learnt to always do this on an old sheet as the one time that I haven’t I’ve had to use sugar soap and a scrubbing brush to remove the sticky residue off of the floor.


It’s just much easier to throw down an old sheet, then wash said sheet in the washing machine afterwards.

The binding is an orange and white striped print, which is actually poly cotton; thankfully it didn’t stretch too much loose its shape. I’ve just machine stitched the binding on as I was in a hurry to finish this project due to a very excited little boy asking me when I would finish off his train quilt. Usually I love to be able to tack on the last part of the binding my hand.


I would make this type of quilt again (and recommend others too as well) if I was setting out to make a cot quilt with very little time available to me. The quilt top is done, so it makes the whole processes quicker than designing, cutting, sewing (piecing) a quilt top.

Tuesday, April 30, 2013

14 Placemats and a Table Runner...My first commissioned Piece is finished!!!


14 Place mats and a Table runner… My first commissioned Piece is finished!!


Yeah, I can hear you all laughing at me, as I’ve taken my sweet time making this happen in between work, looking after my little guy… and all of the rest. Well I’ve done it! My first completed commissioned pieces and they look great! But don’t you all just line up yet with different things for me to do for you! (I still have far too many UFO’s haunting my spare room and cupboards!)


It all started when my aunt came over for a cup of morning tea when I first moved back to town. She loved that I had quilted myself washable place mats. (As, let’s face it, plastic ones fade, or just aren’t that nice after a while). So with the scraps of wadding from making quilts, I made myself some place mats and she saw them, loved the idea and then commissioned me to make 14 for her and a Table runner. The idea being that she can have many fabulous family dinners, or just use and wash as she needs!


My aunt selected all of the fabric, so all I had to do was cut it up as needed, and of course I cut up too much which led me to create a mini tablecloth for her. (See blog post from December 2012). Which she sees as an added bonus (thankfully), and not a severe oversight on my part.

 
  To make these place mats I’ve just cut up fabric to make braids as if I were making a French Braid Quilt. This has saved a great deal of fabric and cutting in the long run. Then I’ve cut up the Braids as needed to make the centre of the place mats and the table runner.

 
The table runner was a bit scary for me to attempt. I had the length of braid needed, but was worried about how to join the edges in the fashion that my aunt wished.  I worked it out and then felt silly for not being able to do it sooner.


The binding for these is an apricot linen type material which was difficult to sew.  After doing this project I will not attempt to quilt any fabric that is not cotton. There were cottons, batiks, upholstery fabric, poly cottons and linens used in this project.


I used bamboo batting or wadding for this project. I purchased a double bed sized bagged amount of bamboo wadding (from Spotlight) and managed to use it all, by carefully cutting as needed.


To quilt I’ve used Ranstant and Gutermann threads. As I’m doing more and more, I’m binding by using the Spray. I do wait a few days so that my needle on my machine doesn’t gum up. And I find that its next to useless to baste spray anything when it’s raining, ultra hot (so if one’s breaking a sweat) or  if it’s constantly overcast, but it might or might not rain….basically any weather that we’ve had in the last six months!

Saturday, March 30, 2013

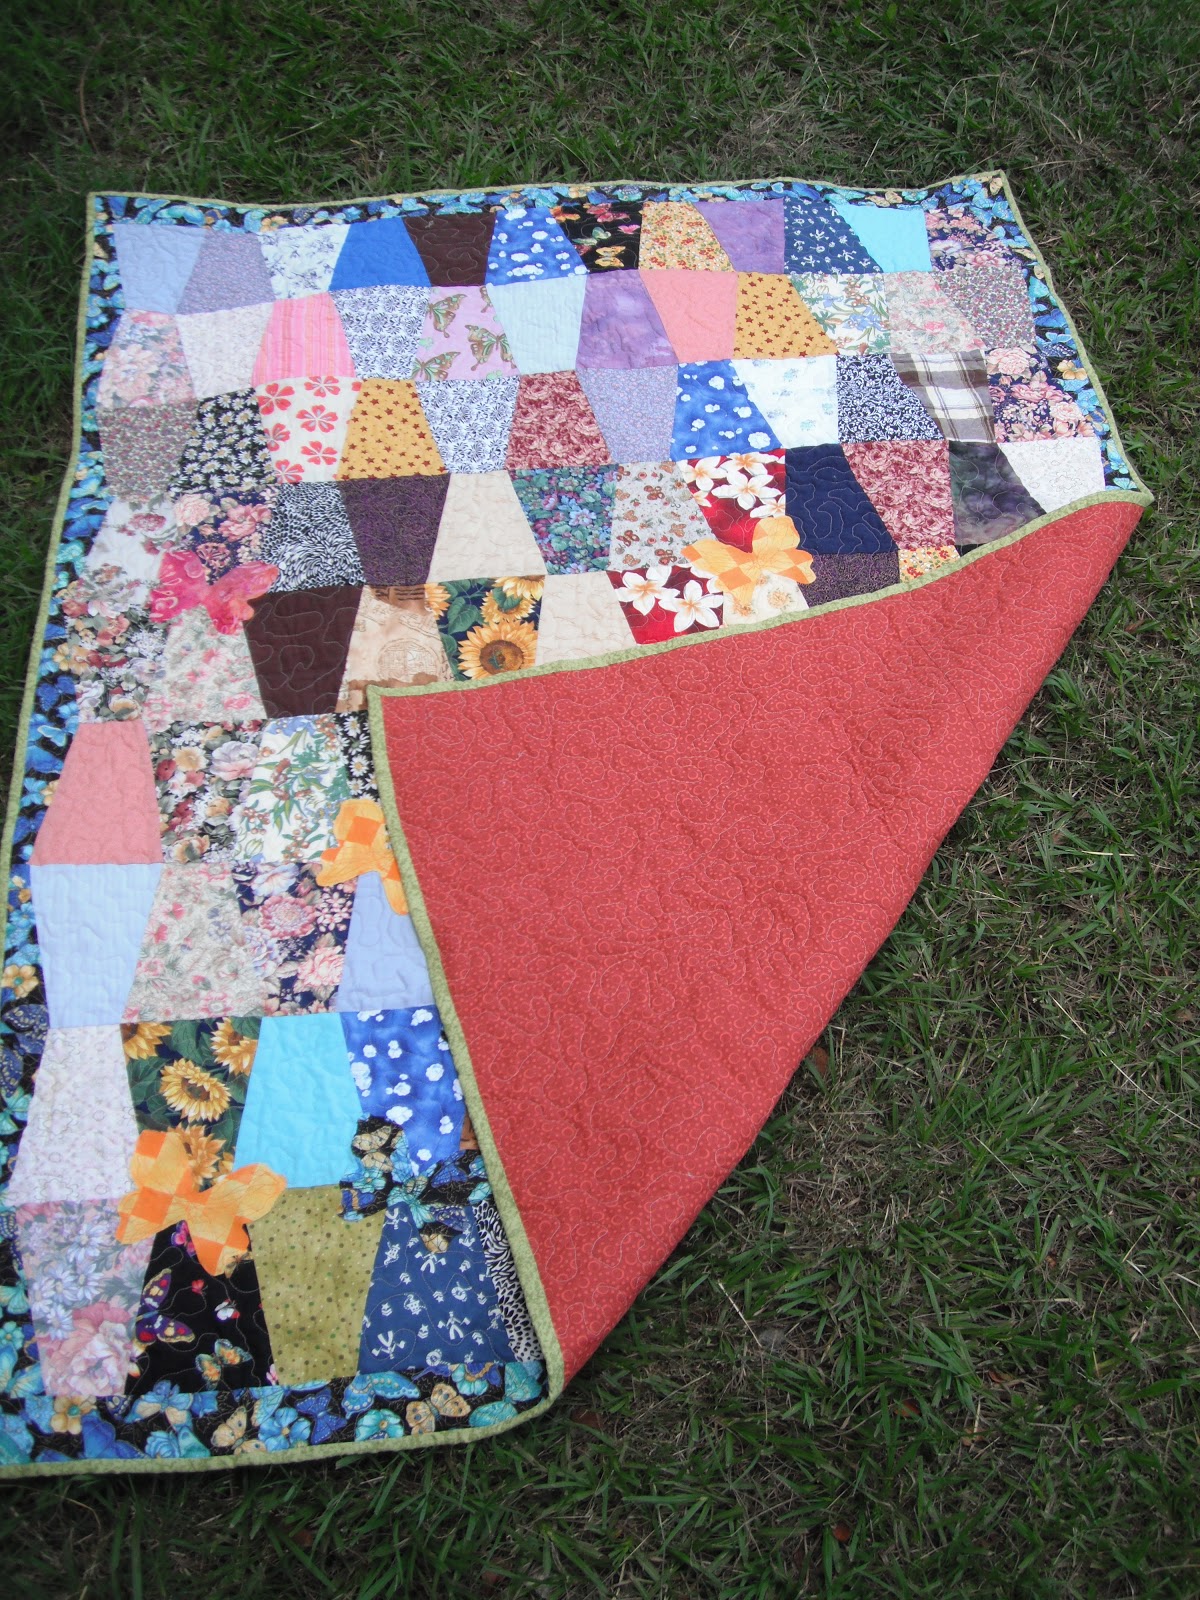
Hidden Butterflies Tumbler Quilt


Tumblers Hidden Butterflies Quilt


Second UFO Finished! Phew! That feels so much better!

My goal or resolution this year is to finish more UFOs. In quilting terms a UFO stands for Un Finished Object. So my apologies if Google has led you astray. This blog post isn’t about me finally finishing building a UFO in the backyard! Maybe next month…

This is actually the third quilt that I started. Well, I started cutting up some of the fabrics in late 2009. Then a friend was due to have a baby, so it got put away while I made her the Papillion quilt (see my blog post Papillon Quilt, June 2012). Then I moved house, so it got mislaid in a large box of other craft stuff for a long while.


The fabrics are a variety of cotton, poly cotton and batiks. Since I started this when I was new to quilting I didn’t have a fabric ‘stash’ back then (hard for me to believe now that I have two 65 litre tubs of fabric!!) My Nanna had given me a few scraps of her fabric to get me started on my quilting journey when she heard that I had started quilting. Then my mum gave me a box of fabric when she thought that she was moving across the other side of the country. I have also included fabrics from a friend who was moving to Canberra and gave me several bags of clothing that her family didn’t want to take with them. So after sorting through the bags I found some great shirts to cut up. The quilt top is made of at least seventy per cent recycled fabrics.

Some fabrics were sourced from The Fabric Palette in Gladstone (Central Queensland, where I was living at the time) in the form of strips or fat quarters. The yellow and orange print was purchased from Lindcraft Gladstone and had a barcode sticker on it. Even after prewashing the fabric it was still sticky, so this had to be cut out and thrown away. I will never buy fabric with stickers placed on the fabric again.


The tumblers part of the quilt is from the Australian Quilters Companion, Vol. 8.3, No.37, Funky Tumblers, pages 90-94, Chris Jurd.
 
To make the Tumblers I got some template plastic from Lindcraft Gladstone to cut up the templates required. The problem was that I kept on trimming my templates as I cut the Tumblers with my rotary cutter. Now there are all sorts of wonderfully florescent coloured templates, and should I ever need a template again – I will most definitely invest in one! So the Tumblers that I cut up last are slightly smaller than the Tumblers that I cut up first. This is why some of the Tumblers don’t quite match up as I feel that they should. I have been told that it’s not noticeable by a non-quilting friend, but I knew and I didn’t like the look of it…which is why I decided to add some butterflies.


The idea of putting the Butterflies on with Vliesofix was still on my mind from making the Papillon quilt (see my blog post Papillon Quilt, June 2012). The butterfly template is from Australian Better Homes and Gardens Magazine, February 2008, page 166. I arranged them at random angles to cover any slight areas where the tumblers didn’t line up, and to make it appear more naturally like how the butterflies would randomly glide about, I think it worked well.
 The wing vein pattern on the butterfly is how the butterfly patches are attached to the quilt top. The edges of the butterflies will naturally fray slightly with age and general wear, but this will add to the general appearance of the quilt as it ages.


When quilting I have quilted around the butterflies (bar one which was unavoidable). So on the backing side there are rough outlines of un quilted butterflies. I wouldn’t have left these sections un quilted if they’d been any bigger as it would mean that the quilt wouldn’t be able to be machine washed. As I live with a six year old boy, I am a firm believer in being able to machine wash everything regularly and with ease.


The thread that I used to quilt was a light Peach Rasant 120. I used roughly three bobbins worth, while quilting. I remain deeply disappointed in the thread. It broke constantly. I changed needles, cleaned and oiled the machine, even changed bobbins. It was just the thread. I won’t be buying it again. Best form of protest I know.


The wadding is Bamboo, which I love to use as it’s so thin and easy to machine quilt. Bamboo also remains warm, and is made from a renewable resource. So between the wadding and the recycled fabrics, this quilt is very environmentally friendly.

The backing is an orange or rust coloured geometric print. This was just the fabric that struck my eye when I was out searching for backing fabric.


The binding was purchased from Spotlight for $19.99 premade. This is the first time that I’ve used this and I would use it again as long as the colour of the binding was suited to the quilt. It was wonderfully different to have binding with no seams in it and to not have to think of where the seams would fall around the quilt. Ultra simple binding, a must for all of those that hate binding!


To baste this quilt I used a new basting spray (as I couldn’t find my preferred brand the last time that I was looking for it). Birch Basting and Quilt Spray, it didn’t perform as I feel that it should have. It was fine for this quilt, but the other that I was basting at the same time didn’t stick together at all. This could have been due to the humidity and incessant rain. But what I don’t understand is why one quilt would stick and then the other not. Both were sprayed within half an hour of the other, in the same conditions. Hmmm…a quilting mystery!

 
I did enjoy making this quilt, so I don’t think that this is the last time that I’ll make a Tumbler quilt. In fact I’ve stumbled across another pattern in an old magazine, so the next Tumbler design will be slightly different.
The quilt measures 45inches by 59.5inches or 115cm by 150cm. So it’s the perfect sized lap quilt or a short single bed quilt.
This is the first quilt that I’m offering for sale. I’m selling this quilt for $170, so please contact me if you are interested. I’m offering free delivery in the Greater Brisbane area. Otherwise, please note that I will only mail my quilts by registered post, so this will add to your cost.


Wednesday, February 27, 2013

Dr Who Scarf


Doctor Who Scarf

Remember Tom Baker’s iconic Dr Who Scarf? Well I made it!


While trolling the internet for free knitting patterns, I managed to stumble across this gem from www.drwhoscarf.com (who clearly state that the Dr Who Scarf patterns are the property of the BBC Worldwide Ltd and no infringement is intended or implied).  What a wonderful website!
Apparently there were a few different scarves, I only remember the ‘classic’ style that I’ve ended up making, otherwise known on the site as the Original or S12 pattern.
 I started knitting in October and now finished knitting at the end of January. Though there were some days where I didn’t get a chance to do any knitting due to the usual stuff like work, friends and family.


I know, I know I said I’d have those placemats and table runner finished and posted as my next blog, but you guessed it, I’ve been distracted once again.

In all fairness this is a nice portable project which meant that I got to work on it a lot more over the Christmas and New Year’s break while I was off out and about. Also I’ve decided to give this scarf to my little brother for his birthday which is the end of January, so I had to hurry up and finish it!

My brother and I used to watch Dr Who after school on the ABC’s The Afternoon Show, so he was pretty impressed when I told him I was making him the scarf.


As per the instructions from the site, I cast on 66 stitches and have knitted the scarf in garter stitch. All up I believe that the wool cost me just under $40 and I still have more than enough to make another scarf if I so desired…


To get the colours as close as possible to the original scarf I’ve had to resort to using some wool and others as acrylics. Unfortunately, as neither had the right colours for me to not have to mix and match. So it will be interesting how the scarf weathers in time, as I’m sure that sections of it will stretch differently.

 
 To knit the scarf, I’ve used my favourite green size 4 knitting needles, a pen, a notepad, a crochet hook (for tassel making) and various colours of wool.
 
 
 To ensure that I was up to the right colour at the right time I’ve kept a tally in a small notepad. The number in brackets behind the colour is what is required, and I’ve just tallied it off as I’ve gone. It saved me from having to continually load the pattern page on my smart phone.
 
 
 It’s taken a few solid hours just to neaten up the thread ends and stitch them back into the scarf. Hmmm, note to self, next time be kinder to myself and leave longer thread ends to work with (no matter how irritating they can be whilst actually still knitting) as it will make sewing the ends in so much easier! The instructions for how to make invisible joins were on the site, in the tips section.
 
 
To make the tassels I’ve had to consult with YouTube yet again, as I’d never made them before. The original scarf pattern calls for 12 tassels each end. I discovered I’m not a fan of making tassels, so I decided to make just enough that it would suit the scarf. So I ended up with 7 tassels each end, at approx. 2 inches apart.
 

The scarf is 12 inches or 31cm wide, 50 inches or 127.5cm long. Once the tassels were added it became 57 inches or 145cm long. Not metres and metres long, but it will stretch in time.