Sunday, April 8, 2012

My French Braid Quilt

French Braid Quilt

On the way to work one day I stopped at a newsagent to gab myself some 'lunch break reading', it was then that I stumbled across a magazine called Down Under Quilts. Being new to quilting I decided to purchase the mag and fell in love with the quilt on the front cover. Even though I was already in the middle of 'piecing' another quilt for myself I HAD to make this quilt and so the madness began...

This quilt contains 602 rectangles which are then made up into 7 'Braids'. Which means that there are approx 86 rectangles per braid.
I had a lot of fun cutting up all of the fabrics, most of which were purchased from eBay stores in the Charm Pack or Jelly Roll style. In fact I ended up buying too much fabric and had enough left over to make another quilt without having to rush out and buy more to get it started.


In fact I've ended up getting caught in a cutting out rut and ended up with far too many spare rectangles and so have made a couple of cushion covers for a friend in the same style.
While cutting up the fabrics I managed to watch a lot of DVDs once my son had gone to sleep for the night. I even got some strange looks from work mates who were keen to have a knock off drink, but were put off with the excuse that I was desperate to get home and keep on cutting up my fabrics.


I put off completing the binding as I was worried that I'd stuff up the last join of the binding. Now of course I consider myself a bit of a binding pro and feel silly for not finishing the quilt off sooner and being able to use it.

The backing fabric is a beautiful chocolate butterfly vintage style print which was a wide back. I purchased this though the lady who did the long arm quilting for me. I just looked at the website and made my selection and let her know what I wanted. Too easy.
The top of the quilting thread is a combination of brown and tan which melds into the sashing fabric colour, as well as standing out on some of the darker fabrics for a nice effect. The thread used on the back is a dark brown which blends into the backing fabric beautifully.

The quilted pattern is butterflies and leaves with swirling flowers.


For the binding I used a distinctive black and white daisy design.
The batting was also purchased from the long arm quilter as I would have found it difficult to find a batting that would match the quilt for size.

All in all, I'm pretty happy with the quilt that I've made for myself!


Tuesday, April 3, 2012

Scotty's Quilt or adventures in a Quilt Kit from eBay

Scotty’s Quilt or Adventures with a Quilt Kit from eBay
This quilt was a 30th Birthday present for one of my oldest and best friends. I struggled for some time to find a quilt that would be suitable for a male. Whilst looking at fabric on eBay I happened to stumble across this quilt kit and thought that it would be appropriate for anyone.
This quilt was a lot of fun to make and came together very quickly. I highly recommend purchasing a quilt kit when you are well and truly sick of measuring and cutting! In fact I think that every quilter should make themselves try it just once and then you can make up your own minds!

 
I must admit that this is the first quilt where I attempted to sew triangles, and the very thought of that as a relatively new quilter really terrified me. But after doing a little bit of research on Google and in quilting magazines I discovered a way to stop the ends of the triangle bunching up or getting caught in the feed dogs and therefore wrecked. I start every seam now with a little snip of fabric, and since making this quilt I have made that a general practise no matter what I sew now.


I think after cutting up so many rectangles for my own French Braid quilt I really enjoyed the reprieve of not having to do any cutting. I do most of my cutting in front of the TV, but still we all know that even with a rotary cutter there is a fair amount of strain on fingers, wrists and joints...regardless of your age!
Firstly I sewed together the striped squares; there were a total of sixteen coloured squares to be sewn from four quarter triangles.  I then sewed the squares to the black fabric as per the instructions. Then I laid the large strips out on the floor to see how it would look once complete. Next I sewed the strips together to form the centre piece of the quilt. Then there was a strip of striped fabric to be sewn.

At this stage I realised that there was a mistake and that this quilt was nowhere near enough to being what I intended it to be.  (Being a grown man, and wanting all of my quilts to be used, I thought that it was best that I made the quilt a bit larger so he’d be more likely to use it on his bed).


So I took one of the last black strips of fabric from the kit and set off for the quilt shop to try and match it. I also obtained some more striped fabric to make another border, as well as another type of striped fabric to make the binding (which usually isn’t included along with the backing or the wadding in most quilt kits from what I can determine).
I washed the new fabrics separately and waited for them to dry and then cut them to the size that I needed. I then added the extra ‘round’ of the quilt and was happy that it would be a decent size (and also pretty keen to get it into the quilters so that I would have a chance to get it to my friend for his 30th). I used the services of the same long arm quilter who used a variegated thread in a slightly different style to stippling.
When the quilt came back this time I was all prepared with the binding all made up and ready to be sewn on.
My friend loves his quilt and is in awe of my efforts and I know that it’s something that he will always use!

Monday, April 2, 2012

The first quilt I ever finished.

Time to show off a bit and show you my first completed quilt!

So I’m a bit obsessed with quilting and patchwork and at any given time have far too much fabric, as well as some half cut up bits and pieces of fabric and too many quilt tops in various stages for my own good. My guest room needs to be cleared (and this can take about an hour, just to move stuff out of there, so that guests can actually get to the bed!). We don't have visitors all that often, so really it's known as my craft room.
I wasn’t warned when I purchased fabric on an impulse to make my first quilt that this would become an all consuming addiction.  No one gave me any clue that soon, I wouldn't want to go through one day without sewing, selecting new quilts to make, sorting or buying more fabric.

But I’d like to show off some of the quilts that I have made and tell you all about them, while I try to complete another project...
So the first quilt that I completed (although it’s not the first that I started, and I’m sure that the previous comment will only be understood by someone who has also caught the quilting bug) was for my son. I started it in April 2009 and ended up finishing it in October 2009. Which I thought wasn’t all that bad going for someone who worked part time, looked after the home and all the other stuff that has to get done, decided half way through the quilt to order fabrics off of eBay (and wait and wait and wait) for them to arrive. Then as an impulse I’ve decided to make the quilt bigger so that it was more of a single bed sized quilt instead of just a baby sized ruggy. I justified this to myself as I was putting in a fair amount of time, money and effort and wanted the quilt to be something that my son got to keep on using as he grew, not something that ended up taking up more space in my already crowded linen cupboards and sat out of sight.
So the inspiration for this quilt is from a magazine, and although I did deviate from the instructions I will provide the details. Zoe Clifton. “On Four Wheels”. Patchwork & Stitching. Vol 9, No 7. Pages 20-23.

First up I had real difficulty finding boy fabrics (that I liked enough to have in the quilt) in a rural town and scoured five quilt shops within a 300km radius. Then I checked out what was available on eBay and actually ended up buying some licensed fabric that way and it worked out to be very reasonably priced.  
I managed to get Bob the Builder Fabric, The Simpsons Fabric, Thomas the Tank Engine Fabric, Cars Fabric and Buzz Light-year Fabrics all from various eBay sellers.
I then purchased the Green polka dot fabric from the new local Lindcraft store to make the borders to turn a quilt designed to be 125cm (49 inch) into a quilt that is now 119cms (46.5 inches)  across by  187cms (74 inches) long. So the quilt fits nicely on a king single bed.
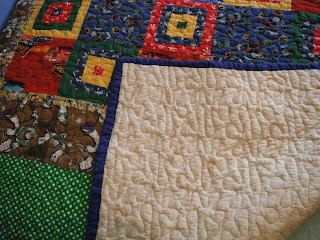
The backing fabric was purchased from The Fabric Palette in Gladstone and I had to sew it side by side to fit. Knowing what I know now, I no longer use light colours as a backing fabric; but like I said it was the first quilt that I completed so I didn’t know any better.
The quilt was professionally quilted by a long arm quilter in the area in the stippling style. The thread used to quilt it is a variegated red, orange and yellow thread on top and on the back it’s a cream colour that blends in nicely to the backing.

The binding I made myself once the quilt came back from being quilted. I made the binding out of navy blue homespun fabric. The binding was sewn onto the quilt by machine and I finished it off by hand which took me two days of solid sewing in a busy household. From the top the binding appears to measure half an inch, but it was made from a 2.5inch strip, folded over and sewn onto the quilt, then folded and tacked on.

The sense of achievement that I felt making my son his first patchwork quilt made me feel so good, that I have been hooked from that moment on. I have since finished another four quilts and have another four quilt tops ready to be basted and then quilted, as well as several more beginnings of quilts. I'll keep you posted as to how they go...