Showing posts with label Floral. Show all posts

Wednesday, January 28, 2015

Single Hectic Eclectic Bordered Quilt. An Amazing stash buster quilt.

Single Hectic Eclectic Bordered Quilt. An Amazing stash buster quilt. 


My first UFO down for the year. What a fantastic start to the year.  I love the feeling of finally finishing off a quilt that has had to be put aside for other projects time and time again.


I plan to get more UFO's (Un Finished Objects) completed this year. The goal is by the end of the year to have no remaining UFO's remaining hidden in my sewing room cupboard, or in plastic tubs forgotten about under my sewing table. Same goes for the odd shoe boxes of fabric cut up and waiting to be sewn into something pretty, usable and useful stashed in various places around the house. 


This single Hectic Eclectic quilt is the other half of the previous Single Hectic Eclectic quilt that is currently up for sale on my madeit.com.au/Netto store.  Originally I had planned to make them into a double quilt, but then changed my mind and made two single quilts.

I love that they are both amazing stash busters. This pattern allows you to showcase so many different beautiful fabrics in a variety of sizes.

Some of these fabrics I purchased myself at a variety of fabric stores, one was from Big W, and others were given to me as a gift for Christmas many years ago. 


I can see myself making another of these style quilts again in the future. (Maybe when I have no remaining  UFOs lingering and making me feel guilty about not finishing my projects in a more timely manner.)


Some of these fabrics have been cut since I first started quilting. Prior to making these two single bed quilts, I made myself a double bed sized quilt. Although I now have a French Braid quilt on my bed, I do drag out my double HE quilt when it's needed to throw on the bed, or to give to a house guest that stays over. I've even used it as a picnic blanket on the beach when we went 4WD on Bribie Island. 


The backing is a black geometric print. I quilted this with a blue variegated thread. This one was Gutermann colour 9986. I like the way that it pops against the dark background.

The quilt top was quilted with Gutermann colour 919, which I ran out of during the quilting process. So the quilting was put on hold overnight while I had to wait to get another thread spool. 


For the boarders I had enough left over from my own French Braid quilt. I love this fabric. The reason that this quilt has a boarder is to make it to single bed size. This quilt has six squares across instead of the seven that the other quilt had.


For this quilt I decided upon a premade binding that took my fancy while trying to work out what to spend my Christmas vouchers at Spotlight on. Premade binding always comes in handy and is so hard to go past. I was lucky that I was able to get a different pattern this time.


As yet this quilt is not for sale. However I may change my mind on that. After all a girl can only have so many quilts in the cupboard....

My store is www.madeit.com.au/Netto


Sunday, March 30, 2014

Elegant Floral Lap Quilt


Elegant Floral Lap Quilt


This quilt ended up being 52.5 inches x 52.5 inches, so it’s a lovely lap size quilt. I gave this to an old friend of mine at her baby shower. So she can use it for bub, or for herself.

The inner square of this quilt were pre-cut and sold as a pack which I obtained from Lincraft Toombul. There were no instructions so I laid the squares out to get a feel for how I wanted the quilt to look. Due to lack of space at the time I ended up laying out the quilt on my bed!


Again the edges of the squares were cut with the zigzagged edges. Still not a fan, as this can be very hard to line up and have everything look straight when sewing. However it saved me having to cut up fabric, which can feel like it’s taking forever when I’m itching to sew. So I’m learning to just go with it. Besides, when I saw the fabric squares I just HAD to buy them…they were too pretty!


I sewed the squares together in a strip first. While leaving the remaining quilt squares laid out in the pattern that I wanted to make. Then as I’d sewn each strip I replaced the strip to the unsewn pattern laid out on my bed, so as to make sure that I didn’t get any squares out of order.


As usual sewing for an hour or two can feel like five minutes, so I ended up having to pack away all of my sewn up strips. I didn’t want any to get out of order, so I’ve laid them carefully over a chair (this is so I could try to take up the project again when I had some more spare time).  And also as I HATE ironing!!! So it was my hope that I wouldn’t need to re-iron everything all over again when I did get a chance to get back to it. I pretty much only iron when I’m quilting to ensure everything ends up being straight, or if I happen to have some epic event that I need to attend.

After sewing the central squares together I decided that I wanted to make the quilt at least the size of a lap quilt. So I rummaged through some of my scrap fabrics to see if I had anything that would suit the style of the quilt and to make sure that I had enough fabric before heading off to buy some more. Luckily I had a lovely print which I had plenty of to add some classy edging borders to the quilt. The border edges are roughly 6.5 inches.


The backing is a mustard coloured geometric circle print, which I felt could tie in with the binding fabric. Originally I searched high and low for a green fabric for the binding. However I just couldn’t find anything that I really liked, that I felt would suit this quilt. The prints in them were either too big or too small, or just didn’t feel right.

I ended up using a brown printed fabric that I had actually gotten with another project in mind. So since I laid it next to the quilt top and the backing fabric and it seemed to be the only thing that I could find that tied it all together… I went with it.


I quilted the quilt by making straight lines on either side of the strips seams. Which was a little tricky, as due to the way the squares were cut; not everything lines up 100%. That said I think that I did a pretty good job. This was the first quilt that I quilted with straight lines, and it was difficult not to have puckers (even though I had used a binding spray and it was very well stuck together before I started quilting). For the quilting threads I’ve used an off white coloured thread for the top and a golden/mustard coloured thread for the backing so that it blends in.


Hopefully I’ll have time to blog about the other quilts I’m making next month, however I’m flat out trying to find the time to sew!


Sunday, February 2, 2014

My new scrappy cot quilt


My New Scrappy Cot Quilt


My poor crafty blog has suffered a bit the last year from lack of action. It wasn’t that I wasn’t constantly thinking of blogging or crafting…I was.  Let’s just call it ‘technical issues’ and leave it at that, or this could very well end up being yet another rant blog.

 
Anyways let me show you what I have been up to…


Once in a while I’ll spot such a beautiful quilt that I do something that I know I probably shouldn’t…I ditch all my other current UFOs (In this case it stands for Un Finished Objects) and start to make yet another quilt.

 
This time I feel totally justified in doing so, as this quilt was so much fun to make and it truly is striking! In fact I’m already thinking about making a double bed sized version of this quilt. This version is a cot size; it measures 96cm x 132 cm or 37.5 inches x 52 inches.


This beautiful cot quilt is inspired by ‘The Original Ticker Tape’ pgs. 138-141 from the book ‘Sunday Morning Quilts’ by Amanda Jean Nyberg and Cheryl Arkinson.


With this quilt the ‘quilt sandwich’ is made first. I used my favourite quilting spray and basted my quilt. For the top of the quilt I used white homespun fabric.  The wadding is cotton, which was purchased pre-cut to cot size. While the backing fabric is vintage cotton Australian wildflowers print.

 I started working on the quilt top by laying out scraps of fabric to see how it looked, then when I was happy with the layout I pinned the scraps to the top of the quilt.  During this process I actually ended up causing myself a few nasty needle stick injuries from the pins. So I took the time to unpin them all and re pin them with safety pins instead. What I would recommend for anyone else that attempts this style of quilt in the future is to just use safety pins from the start.


The scraps are sewn on by rotating the quilt around the needle with the needle down in the work. So the scraps are designed to fray with wear, which will over time give the quilt a rustic look and feel.

 This is a great way to use up odd scraps of fabric. There’s an array of beautiful scraps that are from my previous projects, while most are left overs from other’s fabric stashes from when I first started to get interested in quilting and they were kind enough to send some unneeded fabrics my way.


The backing is a vintage Australian Floral Print, which has featured in my first Papillion Quilt. But being such lovely fabric I wanted to keep it uncut, so I’m excited to use it as the backing for this project.

 This quilt is up for sale on my madeit.com.au store which is called Netto. I’m hoping to complete some more quilts that I can add to my store over the next few months.


At this stage my store items are only available in Australia. However if you see something that you just lurve, let me know and I will investigate the postage and customs restrictions for your country to ensure that your quilt will reach you.

 I hope to show you another quilted project next month.


Saturday, March 30, 2013

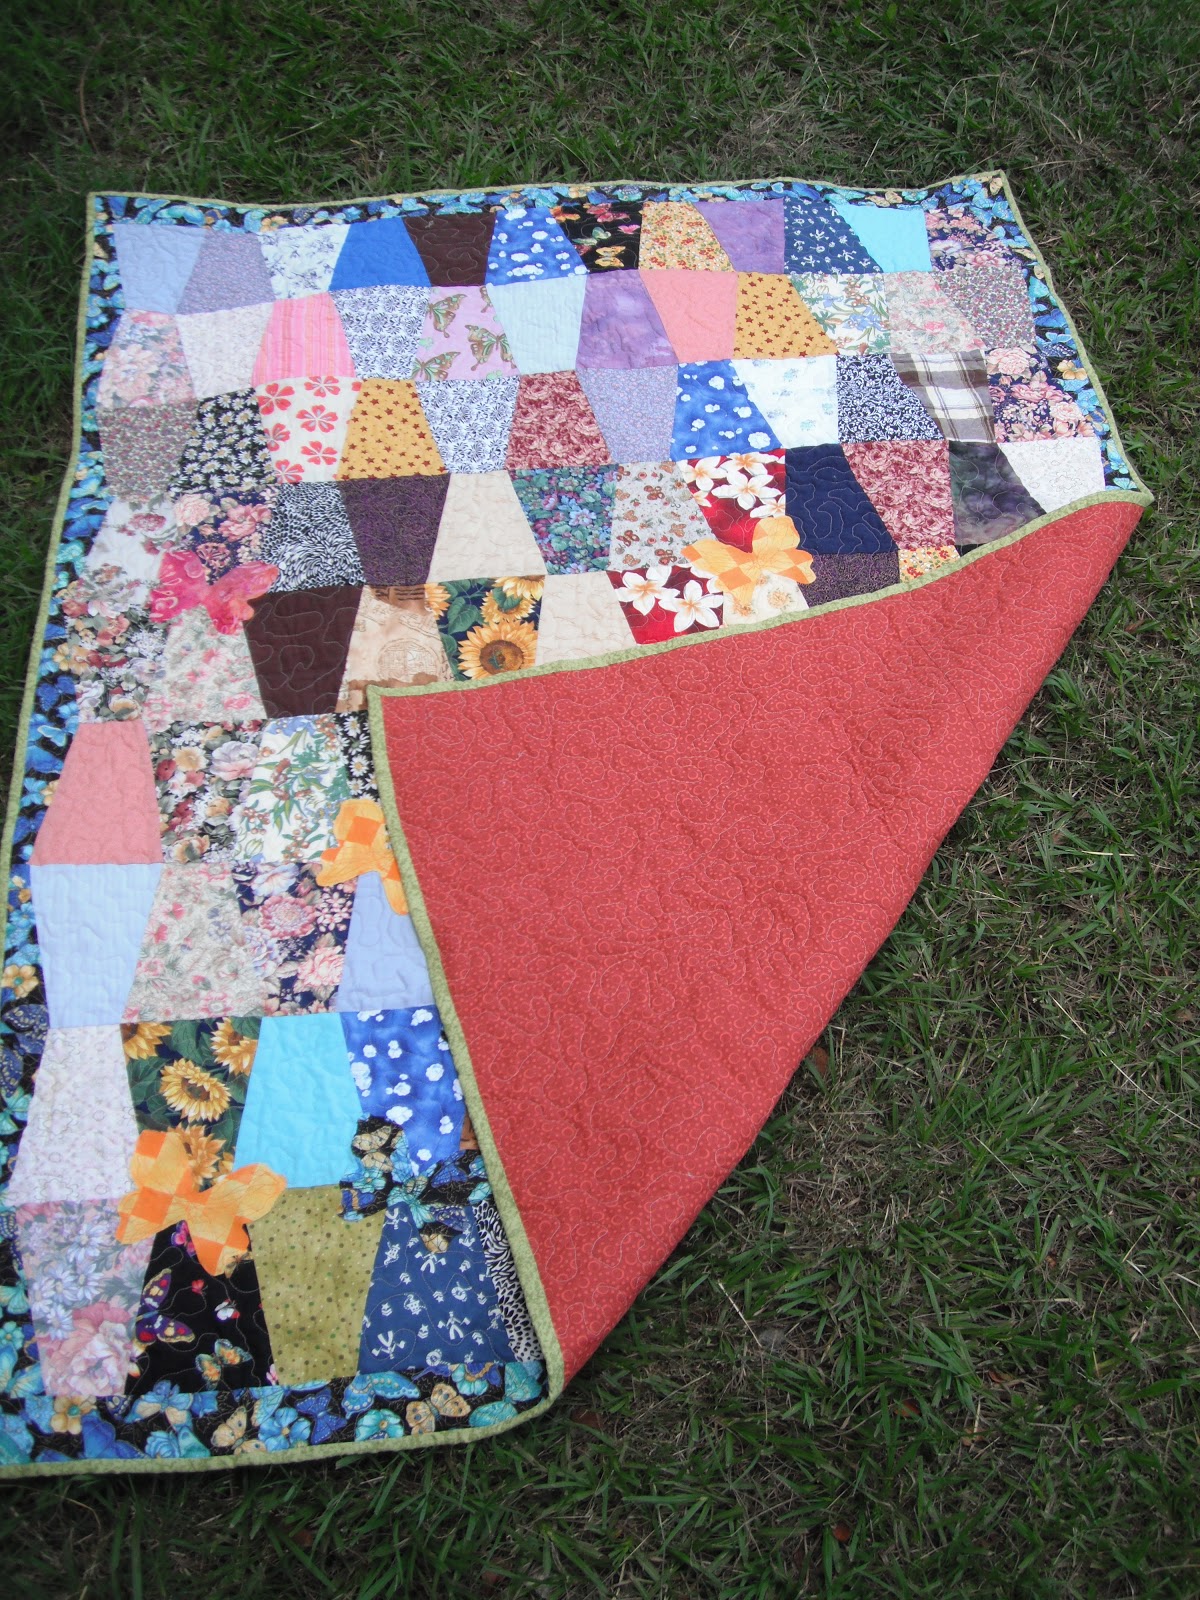
Hidden Butterflies Tumbler Quilt


Tumblers Hidden Butterflies Quilt


Second UFO Finished! Phew! That feels so much better!

My goal or resolution this year is to finish more UFOs. In quilting terms a UFO stands for Un Finished Object. So my apologies if Google has led you astray. This blog post isn’t about me finally finishing building a UFO in the backyard! Maybe next month…

This is actually the third quilt that I started. Well, I started cutting up some of the fabrics in late 2009. Then a friend was due to have a baby, so it got put away while I made her the Papillion quilt (see my blog post Papillon Quilt, June 2012). Then I moved house, so it got mislaid in a large box of other craft stuff for a long while.


The fabrics are a variety of cotton, poly cotton and batiks. Since I started this when I was new to quilting I didn’t have a fabric ‘stash’ back then (hard for me to believe now that I have two 65 litre tubs of fabric!!) My Nanna had given me a few scraps of her fabric to get me started on my quilting journey when she heard that I had started quilting. Then my mum gave me a box of fabric when she thought that she was moving across the other side of the country. I have also included fabrics from a friend who was moving to Canberra and gave me several bags of clothing that her family didn’t want to take with them. So after sorting through the bags I found some great shirts to cut up. The quilt top is made of at least seventy per cent recycled fabrics.

Some fabrics were sourced from The Fabric Palette in Gladstone (Central Queensland, where I was living at the time) in the form of strips or fat quarters. The yellow and orange print was purchased from Lindcraft Gladstone and had a barcode sticker on it. Even after prewashing the fabric it was still sticky, so this had to be cut out and thrown away. I will never buy fabric with stickers placed on the fabric again.


The tumblers part of the quilt is from the Australian Quilters Companion, Vol. 8.3, No.37, Funky Tumblers, pages 90-94, Chris Jurd.
 
To make the Tumblers I got some template plastic from Lindcraft Gladstone to cut up the templates required. The problem was that I kept on trimming my templates as I cut the Tumblers with my rotary cutter. Now there are all sorts of wonderfully florescent coloured templates, and should I ever need a template again – I will most definitely invest in one! So the Tumblers that I cut up last are slightly smaller than the Tumblers that I cut up first. This is why some of the Tumblers don’t quite match up as I feel that they should. I have been told that it’s not noticeable by a non-quilting friend, but I knew and I didn’t like the look of it…which is why I decided to add some butterflies.


The idea of putting the Butterflies on with Vliesofix was still on my mind from making the Papillon quilt (see my blog post Papillon Quilt, June 2012). The butterfly template is from Australian Better Homes and Gardens Magazine, February 2008, page 166. I arranged them at random angles to cover any slight areas where the tumblers didn’t line up, and to make it appear more naturally like how the butterflies would randomly glide about, I think it worked well.
 The wing vein pattern on the butterfly is how the butterfly patches are attached to the quilt top. The edges of the butterflies will naturally fray slightly with age and general wear, but this will add to the general appearance of the quilt as it ages.


When quilting I have quilted around the butterflies (bar one which was unavoidable). So on the backing side there are rough outlines of un quilted butterflies. I wouldn’t have left these sections un quilted if they’d been any bigger as it would mean that the quilt wouldn’t be able to be machine washed. As I live with a six year old boy, I am a firm believer in being able to machine wash everything regularly and with ease.


The thread that I used to quilt was a light Peach Rasant 120. I used roughly three bobbins worth, while quilting. I remain deeply disappointed in the thread. It broke constantly. I changed needles, cleaned and oiled the machine, even changed bobbins. It was just the thread. I won’t be buying it again. Best form of protest I know.


The wadding is Bamboo, which I love to use as it’s so thin and easy to machine quilt. Bamboo also remains warm, and is made from a renewable resource. So between the wadding and the recycled fabrics, this quilt is very environmentally friendly.

The backing is an orange or rust coloured geometric print. This was just the fabric that struck my eye when I was out searching for backing fabric.


The binding was purchased from Spotlight for $19.99 premade. This is the first time that I’ve used this and I would use it again as long as the colour of the binding was suited to the quilt. It was wonderfully different to have binding with no seams in it and to not have to think of where the seams would fall around the quilt. Ultra simple binding, a must for all of those that hate binding!


To baste this quilt I used a new basting spray (as I couldn’t find my preferred brand the last time that I was looking for it). Birch Basting and Quilt Spray, it didn’t perform as I feel that it should have. It was fine for this quilt, but the other that I was basting at the same time didn’t stick together at all. This could have been due to the humidity and incessant rain. But what I don’t understand is why one quilt would stick and then the other not. Both were sprayed within half an hour of the other, in the same conditions. Hmmm…a quilting mystery!

 
I did enjoy making this quilt, so I don’t think that this is the last time that I’ll make a Tumbler quilt. In fact I’ve stumbled across another pattern in an old magazine, so the next Tumbler design will be slightly different.
The quilt measures 45inches by 59.5inches or 115cm by 150cm. So it’s the perfect sized lap quilt or a short single bed quilt.
This is the first quilt that I’m offering for sale. I’m selling this quilt for $170, so please contact me if you are interested. I’m offering free delivery in the Greater Brisbane area. Otherwise, please note that I will only mail my quilts by registered post, so this will add to your cost.


Saturday, June 16, 2012

Papillion Quilt

Papillon Quilt

This is a quilt that I finished in March 2010 and it was my second finished quilt.
When I saw this quilt in a Better Homes and Gardens magazine, I couldn't wait for an excuse to make it. Then a girlfriend of mine told me that she was about to have a baby girl...


The pattern for this quilt is from Australian Better Homes and Gardens Magazine February 2008, Pages 26, 165-166. The quilt pattern is called Papillon.
The butterfly and birds are temporarily secured to the quilt with Vliesofix before they are quilted on. I did each one at a time, as I have been told that it can come off and make a mess if it's not sewn.

Some of the fabrics in this quilt are vintage Australian flora prints. Note the Sturt Desert Pea in two of the different fabrics.


Note the original border that I had for the quilt. It was a mix of cotton and poly cotton and I found that it stretched too much as I was working with it, so I removed it and added the plain homespun purple fabric instead. I think that comparing the two, in the end I made the best choice. The plain purple 'frames' the quilt nicely, whereas the purple patterned fabric is too busy.


This is actually the best photo that I have of the butterflies close up, the rest were too blurry or the light wasn't right. (Note to self, take better photos of my quilts and lots of them!)
It's hard to see, but with the butterflies I haven't just sewn them on in any of the standard applique styles. I've actually sewn all over the butterfly as if to mimic the veins of the insect.
Again this photo shows the original border that I had on the quilt.


 I had this quilt professionally quilted by the same lady who did my first quilt (and a few more later on). The quilted pattern is flowers with hearts as the leaves. On the top the quilt the thread used was variegated green, yellow, blue and red and on the bottom side of the quilt the thread was pink to blend in with the backing fabric.


The binding is pink homespun fabric which I thought would contrast with the purple borders on the front and the light pink butterfly fabric I've used as the backing.
The back of the quilt. Thought I'd be a bit quirky and add an extra butterfly so it didn't look too boring.