Showing posts with label batiks. Show all posts

Tuesday, September 30, 2014

Baby Girl Quilt...Cat in the Hat


Baby Girl Quilt... Cat in the Hat


 I should be typing up a report for uni which is due next week, however  I'd much rather be doing this. (Well...I'd much rather be sewing!) So I have made a deal with myself, once I get this blog post done and out of my system. (Let's consider this my warm up for my report writing?) It is report time!!


This baby quilt is the size of a cot quilt. The quilt is a long overdue baby gift for a little baby girl. The little baby girl's, mum's nick name is Kat, so I am being very witty by giving them a Cat in the Hat quilt. Plus it's just too cute...how could I resist? I wish that I'd been able to source fabrics like this when my little guy was a bub!

In the background of the Cat in the Hat panel it features text from the famous Dr. Seuss book. I'm sure by the time baby girl is a teenager...both mum and dad will be able to recite the entire thing!


The quilt panel was purchased at a Spotlight store. The red fabric that I used to 'frame' the panel was also purchased from Spotlight (although it was originally intended to be a backing fabric for a different quilt project).  The blue binding (edging) fabric was originally purchased to be the 'framing' fabric on the quilt top. However when I laid the fabrics out next to each other it was just too much blue, especially considering that this was a quilt for a little baby girl.


The batik fabrics were purchased from a speciality fabric store. The batik fabric strips were approximately 20cms wide (which is usually a store's minimum cut for batiks).
 

The wadding was pre-cut cotton quilt wadding which is sold in bags at Spotlight. I love this stuff... it's always the size that it states it is on the bag. It's easy to quilt and it's warm. Perfection in a bag.


The backing consists of seven batik designs. I have sewed the quilt top first and then used the 'quilt as you go method' to both quilt and complete the backing at the same time. The stitching for the backing is not visible in the method. As always... I YouTube how to do this, as it's great to have a refresher on how it's done. To learn how to do this, check out 'quilt as you go' by the Missouri Star Quilt Company on their YouTube channel.


I have used blue variegated thread for where the stitches show on the quilt top. The binding was finished in slip stitch, with a light blue thread that matches the light blue geometric print that was used. This time I  purchased the threads needed at the same time as the fabric, which is very organised on my part. (This almost never happens!) I usually end up running out of thread and need to try and match the thread I've already used.


I actually finished the last two edges of the quilt while I was visiting with mum and bub last week.  It was either that or I would have them waiting at least another week on me to finish the quilt. I'm happy that the quilt is with its new owner, already being used.


Thursday, August 14, 2014

Baby Boy Zigzag Batik Quilt


Baby Boy Batik Zigzag Quilt

As always there seems to be soooo much to do and not enough time to get it all done! I actually finished this lovely baby boy batik zigzag quilt well over a month ago, but with so much going on with uni and the rest of my crazy life I haven't had a chance to add it to my blog until now. I've been feeling guilty about not being more consistent with this blog. Even though I still try to sew every spare moment that  I have (and spend the rest of my time wishing that I had more time to sew!).


As you already know this was originally intended to be a Chevron quilt, but in my haste to get the first quilt done I misread the online instructions. Since this is the matching boy quilt to the girl quilt I did earlier...I've decided to make it the same way.


The fabrics used in this quilt top were an off white homespun (I really should have been a bit clever here and purchased enough of the one batch of white homespun when I started to make the first zigzag quilt, so as to save myself some time and money...oh well, live and learn!).


The batik fabrics I purchased from Sewers Delight in Browns Plains, as they have a new app called Collect where I can collect points and not have another bulky plastic card in my purse. So due to my bargain hunting instincts and the fact that they are close to me,  I thought that I'd check out their range of batiks and there was enough of a selection to keep me going for this quilt without having to track down more colours and designs. The backing is a navy homespun. There are some fabrics from this quilt that I have used in the baby girl batik quilt which was intentional.


I prewash all of my fabrics individually or in groups of very similar colours, I strongly suggest that everyone do the same. This stops you spending so much time on a project that may end up having a colour run later or shrinking and/or  stretching a little and pulling at stitches  making your finished work uneven.

I cut my fabric into 2.5 inch strips and sewed them together. I then cut them into 4.5 inch blocks. I laid out the blocks in a line on the kitchen table and decided which order to place the colours. Once I had a colour scheme I was happy with I sewed together my first row. I then laid out the other rows in the order that I wished to sew them. Once the rows were sewed up, it was just a matter of pressing the rows lightly with an iron and lining up the colours in the order required. At this stage the quilt top seems to come together very quickly.


I almost didn't put a boarder on this quilt. But then I would have had to trim it up a bit shorter on the sides than what I think 'looks right', so I used the batiks that I had left over to make a boarder.

As usual I used the 505 spray to baste the quilt. I left this to set for a few days (this is just something that I do, as I find that otherwise the machine needle gets gummed up).


This quilt has cotton batting, which I have purchased pre-cut and bagged for convenience. The binding is the same fabric as the purple batik that I used for the baby girl batik zigzag quilt.

When I machine quilted this quilt I used variegated thread and used a free motion sewing foot in my own random stippling style.


It seems that every time I finish one baby quilt I hear that another little bundle of joy is on its way. Baby quilts are so satisfying and fun to make, I'm sure I'll have more baby quilts to show you soon.


Tuesday, April 29, 2014

Batik zigzag baby girl quilt


Batik zigzag baby girl quilt


This bright little quilt measures 103cm x 138cms. That's roughly 41 x 54.5 inches.


The mummy of the baby that this quilt now belongs to told me that she lurves batiks... really, really loves them. So  I decided to make her a baby quilt with as many batiks as I could. I really like the way that this quilt has become a bright rainbow quilt.


This quilt features a total of 12 batik fabrics, including the binding. The beautiful purple batik fabric was a gift for my birthday (from the same mummy that I made this quilt for).
The white fabric is homespun and the backing fabric is a light green homespun fabric. The wadding in this quilt is pre bagged cot sized Bamboo Batting which I purchased from my local Spotlight store.

 
Before spraying down the quilt to baste it with 505 spray, I trimmed the batting to reduce wastage. One day I'm going to make a lot of fabulous things out of the scraps of batting I have strewn all over the place.


I had originally intended to make this a Chevron quilt, as I've never made one and they are very popular lately. So I started "googling" on my smart phone (probably while I was pushing a shopping trolley around the supermarket)  for easy Chevron quilt patterns and came across a great no triangles online tutorial at www.DreamPatch.com.au.
This is a fantastic tutorial, and I can't wait to make a Chevron quilt, when I read the instructions properly!


 I started out well cutting my fabric into 2.5 inch strips and sewing them together. I then cut them into 4.5 inch blocks while I watched a DVD and stayed up way past my bed time. (Sadly the reality of it is this seems to be the only time that I had use of the kitchen table, while it was cleared and clean.)


It was between Steps 5 and 6 that on the Dream Patch tutorial that I ran into trouble. I sewed the blocks together vertically. So all my rows formed large "L"s. Not strips of diagonal "L"s!! It wasn't until I had sewed almost the entire quilt top that I realised. So my first Chevron quilt has become a off centre zigzag quilt instead.
I've been assured that it still looks great, but I am still slightly annoyed at myself.
Oh well, I guess that next time I set out to make the Chevron quilt I'll pay more attention to what I'm doing and double check that I'm on the right path.


It turns out I'm going to make the exact same zigzag quilt for a baby boy (hopefully in time for next month's blog). The two babies who these zigzag quilts will belong to will be second cousins, so I plan to re use some  of the same fabrics while still making it a quilt suitable for a baby boy.

 
As always there's always so much to do and get done and not enough time to sew!
I still have quilts for sale at my madeit.com.au store "Netto" if you are after a quilt. I am hoping to add to my store again soon.


Sunday, February 2, 2014

My new scrappy cot quilt


My New Scrappy Cot Quilt


My poor crafty blog has suffered a bit the last year from lack of action. It wasn’t that I wasn’t constantly thinking of blogging or crafting…I was.  Let’s just call it ‘technical issues’ and leave it at that, or this could very well end up being yet another rant blog.

 
Anyways let me show you what I have been up to…


Once in a while I’ll spot such a beautiful quilt that I do something that I know I probably shouldn’t…I ditch all my other current UFOs (In this case it stands for Un Finished Objects) and start to make yet another quilt.

 
This time I feel totally justified in doing so, as this quilt was so much fun to make and it truly is striking! In fact I’m already thinking about making a double bed sized version of this quilt. This version is a cot size; it measures 96cm x 132 cm or 37.5 inches x 52 inches.


This beautiful cot quilt is inspired by ‘The Original Ticker Tape’ pgs. 138-141 from the book ‘Sunday Morning Quilts’ by Amanda Jean Nyberg and Cheryl Arkinson.


With this quilt the ‘quilt sandwich’ is made first. I used my favourite quilting spray and basted my quilt. For the top of the quilt I used white homespun fabric.  The wadding is cotton, which was purchased pre-cut to cot size. While the backing fabric is vintage cotton Australian wildflowers print.

 I started working on the quilt top by laying out scraps of fabric to see how it looked, then when I was happy with the layout I pinned the scraps to the top of the quilt.  During this process I actually ended up causing myself a few nasty needle stick injuries from the pins. So I took the time to unpin them all and re pin them with safety pins instead. What I would recommend for anyone else that attempts this style of quilt in the future is to just use safety pins from the start.


The scraps are sewn on by rotating the quilt around the needle with the needle down in the work. So the scraps are designed to fray with wear, which will over time give the quilt a rustic look and feel.

 This is a great way to use up odd scraps of fabric. There’s an array of beautiful scraps that are from my previous projects, while most are left overs from other’s fabric stashes from when I first started to get interested in quilting and they were kind enough to send some unneeded fabrics my way.


The backing is a vintage Australian Floral Print, which has featured in my first Papillion Quilt. But being such lovely fabric I wanted to keep it uncut, so I’m excited to use it as the backing for this project.

 This quilt is up for sale on my madeit.com.au store which is called Netto. I’m hoping to complete some more quilts that I can add to my store over the next few months.


At this stage my store items are only available in Australia. However if you see something that you just lurve, let me know and I will investigate the postage and customs restrictions for your country to ensure that your quilt will reach you.

 I hope to show you another quilted project next month.


Saturday, March 30, 2013

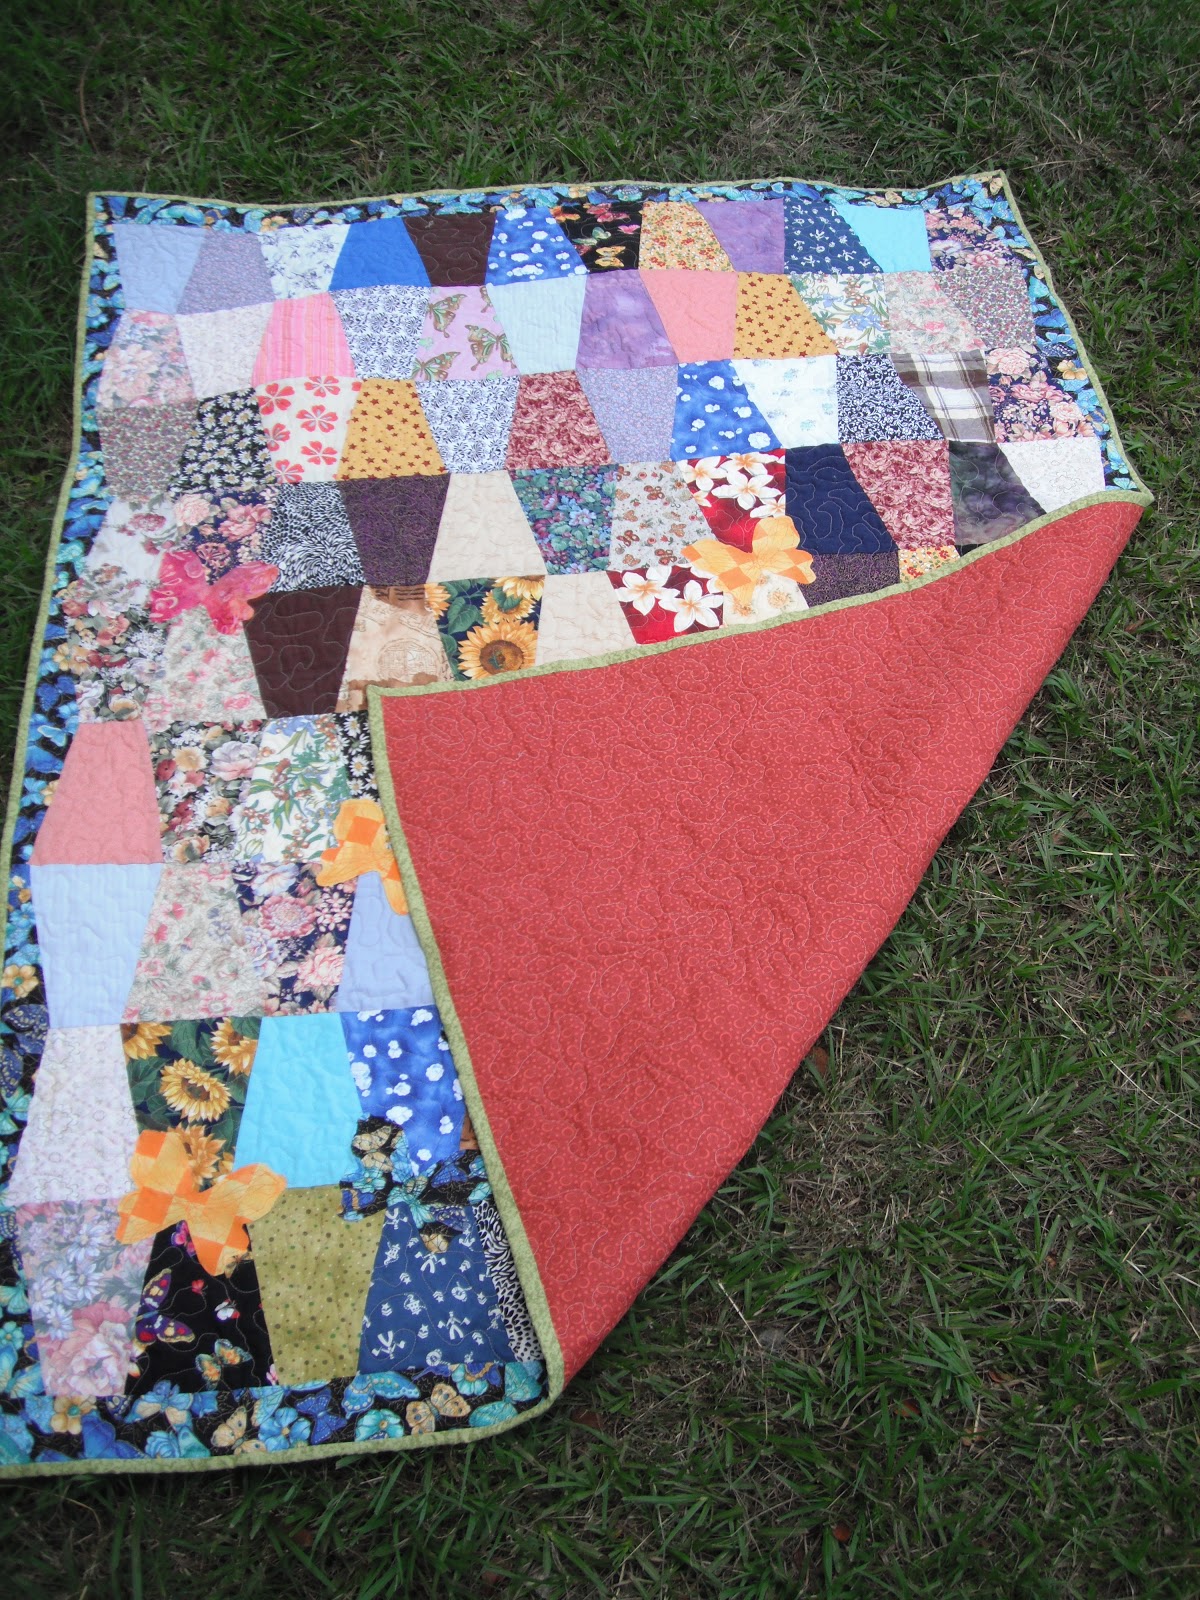
Hidden Butterflies Tumbler Quilt


Tumblers Hidden Butterflies Quilt


Second UFO Finished! Phew! That feels so much better!

My goal or resolution this year is to finish more UFOs. In quilting terms a UFO stands for Un Finished Object. So my apologies if Google has led you astray. This blog post isn’t about me finally finishing building a UFO in the backyard! Maybe next month…

This is actually the third quilt that I started. Well, I started cutting up some of the fabrics in late 2009. Then a friend was due to have a baby, so it got put away while I made her the Papillion quilt (see my blog post Papillon Quilt, June 2012). Then I moved house, so it got mislaid in a large box of other craft stuff for a long while.


The fabrics are a variety of cotton, poly cotton and batiks. Since I started this when I was new to quilting I didn’t have a fabric ‘stash’ back then (hard for me to believe now that I have two 65 litre tubs of fabric!!) My Nanna had given me a few scraps of her fabric to get me started on my quilting journey when she heard that I had started quilting. Then my mum gave me a box of fabric when she thought that she was moving across the other side of the country. I have also included fabrics from a friend who was moving to Canberra and gave me several bags of clothing that her family didn’t want to take with them. So after sorting through the bags I found some great shirts to cut up. The quilt top is made of at least seventy per cent recycled fabrics.

Some fabrics were sourced from The Fabric Palette in Gladstone (Central Queensland, where I was living at the time) in the form of strips or fat quarters. The yellow and orange print was purchased from Lindcraft Gladstone and had a barcode sticker on it. Even after prewashing the fabric it was still sticky, so this had to be cut out and thrown away. I will never buy fabric with stickers placed on the fabric again.


The tumblers part of the quilt is from the Australian Quilters Companion, Vol. 8.3, No.37, Funky Tumblers, pages 90-94, Chris Jurd.
 
To make the Tumblers I got some template plastic from Lindcraft Gladstone to cut up the templates required. The problem was that I kept on trimming my templates as I cut the Tumblers with my rotary cutter. Now there are all sorts of wonderfully florescent coloured templates, and should I ever need a template again – I will most definitely invest in one! So the Tumblers that I cut up last are slightly smaller than the Tumblers that I cut up first. This is why some of the Tumblers don’t quite match up as I feel that they should. I have been told that it’s not noticeable by a non-quilting friend, but I knew and I didn’t like the look of it…which is why I decided to add some butterflies.


The idea of putting the Butterflies on with Vliesofix was still on my mind from making the Papillon quilt (see my blog post Papillon Quilt, June 2012). The butterfly template is from Australian Better Homes and Gardens Magazine, February 2008, page 166. I arranged them at random angles to cover any slight areas where the tumblers didn’t line up, and to make it appear more naturally like how the butterflies would randomly glide about, I think it worked well.
 The wing vein pattern on the butterfly is how the butterfly patches are attached to the quilt top. The edges of the butterflies will naturally fray slightly with age and general wear, but this will add to the general appearance of the quilt as it ages.


When quilting I have quilted around the butterflies (bar one which was unavoidable). So on the backing side there are rough outlines of un quilted butterflies. I wouldn’t have left these sections un quilted if they’d been any bigger as it would mean that the quilt wouldn’t be able to be machine washed. As I live with a six year old boy, I am a firm believer in being able to machine wash everything regularly and with ease.


The thread that I used to quilt was a light Peach Rasant 120. I used roughly three bobbins worth, while quilting. I remain deeply disappointed in the thread. It broke constantly. I changed needles, cleaned and oiled the machine, even changed bobbins. It was just the thread. I won’t be buying it again. Best form of protest I know.


The wadding is Bamboo, which I love to use as it’s so thin and easy to machine quilt. Bamboo also remains warm, and is made from a renewable resource. So between the wadding and the recycled fabrics, this quilt is very environmentally friendly.

The backing is an orange or rust coloured geometric print. This was just the fabric that struck my eye when I was out searching for backing fabric.


The binding was purchased from Spotlight for $19.99 premade. This is the first time that I’ve used this and I would use it again as long as the colour of the binding was suited to the quilt. It was wonderfully different to have binding with no seams in it and to not have to think of where the seams would fall around the quilt. Ultra simple binding, a must for all of those that hate binding!


To baste this quilt I used a new basting spray (as I couldn’t find my preferred brand the last time that I was looking for it). Birch Basting and Quilt Spray, it didn’t perform as I feel that it should have. It was fine for this quilt, but the other that I was basting at the same time didn’t stick together at all. This could have been due to the humidity and incessant rain. But what I don’t understand is why one quilt would stick and then the other not. Both were sprayed within half an hour of the other, in the same conditions. Hmmm…a quilting mystery!

 
I did enjoy making this quilt, so I don’t think that this is the last time that I’ll make a Tumbler quilt. In fact I’ve stumbled across another pattern in an old magazine, so the next Tumbler design will be slightly different.
The quilt measures 45inches by 59.5inches or 115cm by 150cm. So it’s the perfect sized lap quilt or a short single bed quilt.
This is the first quilt that I’m offering for sale. I’m selling this quilt for $170, so please contact me if you are interested. I’m offering free delivery in the Greater Brisbane area. Otherwise, please note that I will only mail my quilts by registered post, so this will add to your cost.


Tuesday, September 18, 2012

Baby batik quilt as you go...


Baby batik quilt as you go...

Is it a boy? Or is it a girl? A simple enough question one would have thought in this day and age. But, believe it or not, there are still parents who don’t want to shout this tidbit of information out to the world. Well not until the moment bub is here and everyone can see for themselves.  And rightly so! A little mystery never hurt anyone, and half of the fun is in the guessing!

Bets have been made, and though we’ve all been trying our hardest, the parents still won’t even let a clue slip.

 
Mum to be has come up with a clever idea while we all place our bets and take our guesses. Why not make a quilt that could go either way? After all, there is a 50/50 chance. So I’ve designed a quilt that’s half suited for a boy, or half suited for a girl. How clever of the mum to be to keep us all guessing!

I’ve designed this quilt with bright batik fabrics. One side is strips of pinks framed in a yellow floral batik. The other side is strips of blue batiks. The quilt is then bound in a delightful green batik fabric. Before starting this project I washed all of the batik fabrics used.
 

First I pieced together the pink side. I sewed the 20cm strips of pink batiks together and then decided that I needed to frame them to make that quilt side measure up. So I used the yellow floral batik to make a boarder around the pink strips.
 

I then basted this pink quilt top to the cotton batting (which I purchased from Lindcraft and was originally 50x60 inches). Then after trimming the excess batting from the basted top I used the quilt as you go method of both quilting the quilt and sewing the blue strip side simultaneously.

 
The pink striped side goes one direction, while the blue side goes another. This is so that there isn’t too much resistance when trying to ‘quilt as you go’. As I’d never used the ‘quilt as you go’ method before, I watched a few tutorials on YouTube before attempting this. The one that I found to be the most helpful was from the Missouri Star Quilt Company. How did we ever get by before we could YouTube or Google things that we didn’t know?

As an extra bit of security, and also as this is a quilt intended for a baby and likely to get washed more, I decided to also quilt through half of the blue strip.

 
As always when a project is a gift that needs to be finished by a deadline, almost everything that can go awry will…

At one stage of the quilting my thread kept breaking even after checking my sewing machine manual. After using some very colourful language and fighting the urge to run over the sewing machine with my car, I checked a few online noticeboards to see what others had done in the same situation and hoped that my machine wouldn’t need a service (well not until I’d completed  this project). As per my research I changed the needle and re threaded again (even though I’d done so recently, I discovered that sewing with batiks needed a larger sized needle) I  hoped that it would work and stop the constant thread breakage, and it did.

 
The thread that I originally purchased with this project in mind was also completely unsuitable, so back to the sewing supply store I went. For the quilt as you go method I ended up reusing the same blue variegated thread that I used in my Hectic Eclectic quilt. The pink variegated thread (which I’d purchased from Spotlight) was too thick and kept coming through on the blue side of the work (and I suspect also played its part in the whole thread breaking debacle). So a new thinner pink variegated thread was purchased last minute from Stumer's Sewing Centre. The variegated pink thread blends in with the batiks instead of standing out like it would on a different quilt.


For the binding the green thread that I’d originally wanted to use was ridiculously bright, so I quickly unpicked this and decided to also use the same green variegated thread that I used for the Hectic Eclectic quilt.

The seam that I had to unpick left some needle marks in the delicate batik fabric, so I’m glad that I didn’t make more mistakes!
 
I ended up buying two more blue panels of batik fabric than what I originally anticipated. These were the darker two panels that are at each end of the blue side. Which I thought helped to balance out the blue side, as before it looked like it was all the same colour (instead of different panels) when I laid out the fabrics and looked at them from a distance. These were purchased from the Patchwork Tree at Alderley. The rest of the batik fabrics were purchased from Quilt Essentials at Eaton’s Hill. The 20cm strips are the minimum cut from these quilting stores and suited my purpose completely as I didn’t want strips that were too thin and would make the work difficult to quilt through.

 
When I make my binding I always refer back to a book I bought when I wanted to get some ideas on how to use up some of the scrap fabrics that I’d begun to accumulate in my quilting adventures.
 
For me there are a lot of firsts wrapped up in this quilt. This quilt is the first that I’ve made for a baby, the first I’ve made for my godchild, the first that I’ve made entirely from batik fabrics, the first that I’ve machine sewn the entire binding on and the first quilt that I’ve ‘quilted as I went’.

 
The end result is a stunning bright baby quilt that I’m glad that I made myself finish before bub arrived. (Otherwise like most of my quilt projects it may lay half-finished in my pile of UFOs for who knows how long?).
I’m now tempted to make myself a bright double sided quilt in beautiful batik fabric strips. I will be strong and hold off on that idea for the moment, well at least until I have fully quilted some of the quilts that I’ve already started.

Now my part is done…all that’s needed now is a newborn to wrap up in the quilt!