Showing posts with label Baby Girl Quilt. Show all posts

Monday, June 6, 2016

Christening Present Simple Patch Baby Quilt


The measurements of this quilt are 39 inches by 50.5 inches or 99cms by 128cms.
This quilt is constructed of four packs of pre-cut squares which I purchased at Spotlight. I started off with two packs and then decided that I needed more, next thing I knew I was making yet another quilt. 

The fabrics includes stripes and florals, in green, dull yellow, orange and blues. Before sewing I arranged patches on the floor and compared squares (four patches together to form a square), then I compared the squares next to each other until I had a layout that I liked the look of. 


The boarder is a white printed fabric that I had purchased prior to starting this quilt, but when I laid out the other fabric that I had purchased this one just looked better. I like to lay all my boarder fabric next to the rest of the quilt top and look at it while squinting, or take a few photos on my phone and compare fabrics.
The backing is a striking purple floral violet fabric which I hopefully have enough left over to be able to use again on another project. 


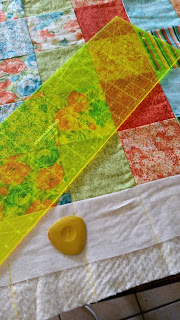
The quilting thread I’ve used for this project is Gutermann cotton which I’ve purchased in 800m so I can use it for a few items. To blend with the green fabric squares on top I’ve used variegated green thread (Colour 9989) on the quilt top and variegated blue thread (Colour 9986) on the back. So that means that I had to load up my bobbins with the blue variegated thread.  I quilted this quilt by following the seams of the centre squares with the quilting foot, so there is no quilting in the ditch, but on both sides of the squares. I used a ruler and some tailor’s chalk to line up the boarder ends with the seams I wished to sew in order to ensure consistency. 


The wadding is pre-cut, pre-bagged cotton wadding that is my favoured wadding to use.  I cut as close to the needed length as possible, so that I should have enough left over for the next single bed or baby quilt project I wish to sew. 


 The binding is Ready to Sew quilt binding available at Spotlight stores for $19.99. I have used this same binding before and I was lucky that I had just enough left for this quilt. Although before I decided upon this binding I did pin it all around the quilt edge to ensure that there would be enough.   I used an aqua Gutermann polyester thread (Colour 763), as I think that it’s the best thread that matches this pre-made binding colour wise. 


 As I was finishing off hand sewing the binding my finance informed me that one of his friends had a baby christening that we were invited to. So it was lovely to know that I had a quilt ready in advance (instead of last minute stressed out sewing) as a gift for this occasion.

Friday, July 31, 2015

Baby Chevron Quilt

Baby Chevron Quilt


Here's a lovely little quilt that I finished this time last month and have been itching to blog about ever since. Unfortunately I have to prioritize sometimes and complete uni assignments, before I can commit any time to leisurely activities such as blogging.

This lovely quilt was purchased as a kit when I spied that it was reduced down to $20.00 at Spotlight around Christmas/New Years. I couldn't go past such a bargain! (I wouldn't even be able to buy the fabric for that).


The quilt kit is called Quiltologie. I was very impressed with the quality of the fabric and instructions and will keep an eye out for more kits from this brand. The binding was included in the kit and the fabric sizes are very generous, so there is plenty of room for error. I would recommend this kit brand to beginners, as it contains everything that they will need other than the wading and backing fabric.

The backing fabric is one that I have used before, as the boarders on the Baby Girl Quilt... Cat in the Hat (Posted September 30, 2014). I had just enough of it left over to back this quilt with. 


To quilt I have used white polyester Rasant 120 thread colour 0010, then to attach the binding or edging of the quilt I have used Gutermann polyester thread colour 763 as it is the one that I found best matched the binding fabric.


The batting I used for this project was the Sew Easy Cosy Natural 100% cotton pre-cut and bagged cot size from Spotlight. The size was originally 127 cm x 152 cm, however I trimmed what I would need (allowing for a few inches or around 10 cm extra on each side while quilting) just before I sprayed the quilt ready for quilting. 


This quilt was fun and very easy to quilt. I did start off quilting it more densely at one end, but decided that it looked and had a nicer feel to it with more spaced  out quilting. While quilting the zig and zag I left the needle in the fabric while I turned the bulk of the quilt,  so as to make sure that the stitches all lined up and I didn't lose my place. I enjoyed quilting this quilt, the zig zags were very easy to do and I will be quilting some more like this again in the future.


This quilt measures in at 130 cm x 107 cm,  or 51 inches x 42 inches which is a good sized cot quilt.  
This was a overdue gift for a beautiful baby girl, so I've wrapped it up in some ribbon all ready for Bub's mum to unwrap. 


Saturday, January 24, 2015

How to wrap a Quilt for a pink baby shower.

How to wrap a Quilt for a pink baby shower.


I know that I have been so slack with my blogging and sewing lately, and while I am hoping to turn that around this year... as always, I will just have to see how I go. Unfortunately studying full time at home, doesn't leave a great amount of time available for anything remotely fun... like sewing. 


Especially when you add things like virus/malware attacks during writing an assignment. Or having to stay up far too late to wait out a thunderstorm and then submit an assignment online. Oh the joys of studying online in Queensland's storm season.
I am still studying my degree online, and while at the moment it feels that it is taking forever, I am slowly, slowly getting it done.


I have called this quilt. I heart Raspberry. Due to the faint heart pattern on the white boarders and the Jelly Roll used being called Raspberry Parlour. I've made this quilt for a friend's baby shower for baby number two.

This quilt measures 43 inches across by 66.5 inches down. Or for those of us who use the metric system, that's 110 cms across by 169.5 cms down. So this is a decent sized single bed quilt.


I used red thread for quilting the top, to contrast with the white love heart boarders around the red and pink central jelly roll fabrics. For the bottom I used an ivory thread which really popped against the dark background on the backing. I used Gutermann threads, the red was colour 156 and the ivory was colour 919.

The batting or wadding of the quilt is natural cosy 100% cotton quilt batting that I've purchased pre bagged from Spotlight. This time I cut a queen-size piece of batting in half and have used it for two smaller quilts. Not sure if it worked out to be cheaper that way, but it was what I had on hand.


The jelly roll was purchased from The Quilters Store in Salisbury. Since moving to the south side of Brisbane, I've slowly been able to explore the different stores on this side of town. (Now I have the best of both sides of town, as I can go and visit the quilt shops on the north side when I visit with friends or relatives.)


The jelly roll/rolie polie used to construct this quilt is called Raspberry Parlour by Riley Blake designs. When looking for ideas on how to make a quilt from a jelly roll I stumbled across some great ideas such as the 'Jelly Roll Quilt Race' on YouTube. My favourite video was the one by the Missouri Star Quilt Company.
Although I didn't like the look of the angle of her strips when pieced together, so I just joined them straight.


The backing is a mix of black homespun and a lovely raspberry and white print fabric. I've cut the raspberry fabric slightly off centre. The white quilted thread really stands out on the black backing fabric, but blends in with the print fabric.

The binding is a fabric which has a mixture of both red and black colours which I felt would look good from the front to frame the quilt, as well as from the back.


I really enjoyed how quickly the jelly roll strips made up the centre of the quilt. It was fun to do. I'm already hooked and plan to do more quilts in this style.

As you can see from the photo this is how I wrapped the quilt for the baby shower. The ribbon was just long enough at 2 meters.


Tuesday, September 30, 2014

Baby Girl Quilt...Cat in the Hat


Baby Girl Quilt... Cat in the Hat


 I should be typing up a report for uni which is due next week, however  I'd much rather be doing this. (Well...I'd much rather be sewing!) So I have made a deal with myself, once I get this blog post done and out of my system. (Let's consider this my warm up for my report writing?) It is report time!!


This baby quilt is the size of a cot quilt. The quilt is a long overdue baby gift for a little baby girl. The little baby girl's, mum's nick name is Kat, so I am being very witty by giving them a Cat in the Hat quilt. Plus it's just too cute...how could I resist? I wish that I'd been able to source fabrics like this when my little guy was a bub!

In the background of the Cat in the Hat panel it features text from the famous Dr. Seuss book. I'm sure by the time baby girl is a teenager...both mum and dad will be able to recite the entire thing!


The quilt panel was purchased at a Spotlight store. The red fabric that I used to 'frame' the panel was also purchased from Spotlight (although it was originally intended to be a backing fabric for a different quilt project).  The blue binding (edging) fabric was originally purchased to be the 'framing' fabric on the quilt top. However when I laid the fabrics out next to each other it was just too much blue, especially considering that this was a quilt for a little baby girl.


The batik fabrics were purchased from a speciality fabric store. The batik fabric strips were approximately 20cms wide (which is usually a store's minimum cut for batiks).
 

The wadding was pre-cut cotton quilt wadding which is sold in bags at Spotlight. I love this stuff... it's always the size that it states it is on the bag. It's easy to quilt and it's warm. Perfection in a bag.


The backing consists of seven batik designs. I have sewed the quilt top first and then used the 'quilt as you go method' to both quilt and complete the backing at the same time. The stitching for the backing is not visible in the method. As always... I YouTube how to do this, as it's great to have a refresher on how it's done. To learn how to do this, check out 'quilt as you go' by the Missouri Star Quilt Company on their YouTube channel.


I have used blue variegated thread for where the stitches show on the quilt top. The binding was finished in slip stitch, with a light blue thread that matches the light blue geometric print that was used. This time I  purchased the threads needed at the same time as the fabric, which is very organised on my part. (This almost never happens!) I usually end up running out of thread and need to try and match the thread I've already used.


I actually finished the last two edges of the quilt while I was visiting with mum and bub last week.  It was either that or I would have them waiting at least another week on me to finish the quilt. I'm happy that the quilt is with its new owner, already being used.


Tuesday, April 29, 2014

Batik zigzag baby girl quilt


Batik zigzag baby girl quilt


This bright little quilt measures 103cm x 138cms. That's roughly 41 x 54.5 inches.


The mummy of the baby that this quilt now belongs to told me that she lurves batiks... really, really loves them. So  I decided to make her a baby quilt with as many batiks as I could. I really like the way that this quilt has become a bright rainbow quilt.


This quilt features a total of 12 batik fabrics, including the binding. The beautiful purple batik fabric was a gift for my birthday (from the same mummy that I made this quilt for).
The white fabric is homespun and the backing fabric is a light green homespun fabric. The wadding in this quilt is pre bagged cot sized Bamboo Batting which I purchased from my local Spotlight store.

 
Before spraying down the quilt to baste it with 505 spray, I trimmed the batting to reduce wastage. One day I'm going to make a lot of fabulous things out of the scraps of batting I have strewn all over the place.


I had originally intended to make this a Chevron quilt, as I've never made one and they are very popular lately. So I started "googling" on my smart phone (probably while I was pushing a shopping trolley around the supermarket)  for easy Chevron quilt patterns and came across a great no triangles online tutorial at www.DreamPatch.com.au.
This is a fantastic tutorial, and I can't wait to make a Chevron quilt, when I read the instructions properly!


 I started out well cutting my fabric into 2.5 inch strips and sewing them together. I then cut them into 4.5 inch blocks while I watched a DVD and stayed up way past my bed time. (Sadly the reality of it is this seems to be the only time that I had use of the kitchen table, while it was cleared and clean.)


It was between Steps 5 and 6 that on the Dream Patch tutorial that I ran into trouble. I sewed the blocks together vertically. So all my rows formed large "L"s. Not strips of diagonal "L"s!! It wasn't until I had sewed almost the entire quilt top that I realised. So my first Chevron quilt has become a off centre zigzag quilt instead.
I've been assured that it still looks great, but I am still slightly annoyed at myself.
Oh well, I guess that next time I set out to make the Chevron quilt I'll pay more attention to what I'm doing and double check that I'm on the right path.


It turns out I'm going to make the exact same zigzag quilt for a baby boy (hopefully in time for next month's blog). The two babies who these zigzag quilts will belong to will be second cousins, so I plan to re use some  of the same fabrics while still making it a quilt suitable for a baby boy.

 
As always there's always so much to do and get done and not enough time to sew!
I still have quilts for sale at my madeit.com.au store "Netto" if you are after a quilt. I am hoping to add to my store again soon.


Sunday, February 2, 2014

My new scrappy cot quilt


My New Scrappy Cot Quilt


My poor crafty blog has suffered a bit the last year from lack of action. It wasn’t that I wasn’t constantly thinking of blogging or crafting…I was.  Let’s just call it ‘technical issues’ and leave it at that, or this could very well end up being yet another rant blog.

 
Anyways let me show you what I have been up to…


Once in a while I’ll spot such a beautiful quilt that I do something that I know I probably shouldn’t…I ditch all my other current UFOs (In this case it stands for Un Finished Objects) and start to make yet another quilt.

 
This time I feel totally justified in doing so, as this quilt was so much fun to make and it truly is striking! In fact I’m already thinking about making a double bed sized version of this quilt. This version is a cot size; it measures 96cm x 132 cm or 37.5 inches x 52 inches.


This beautiful cot quilt is inspired by ‘The Original Ticker Tape’ pgs. 138-141 from the book ‘Sunday Morning Quilts’ by Amanda Jean Nyberg and Cheryl Arkinson.


With this quilt the ‘quilt sandwich’ is made first. I used my favourite quilting spray and basted my quilt. For the top of the quilt I used white homespun fabric.  The wadding is cotton, which was purchased pre-cut to cot size. While the backing fabric is vintage cotton Australian wildflowers print.

 I started working on the quilt top by laying out scraps of fabric to see how it looked, then when I was happy with the layout I pinned the scraps to the top of the quilt.  During this process I actually ended up causing myself a few nasty needle stick injuries from the pins. So I took the time to unpin them all and re pin them with safety pins instead. What I would recommend for anyone else that attempts this style of quilt in the future is to just use safety pins from the start.


The scraps are sewn on by rotating the quilt around the needle with the needle down in the work. So the scraps are designed to fray with wear, which will over time give the quilt a rustic look and feel.

 This is a great way to use up odd scraps of fabric. There’s an array of beautiful scraps that are from my previous projects, while most are left overs from other’s fabric stashes from when I first started to get interested in quilting and they were kind enough to send some unneeded fabrics my way.


The backing is a vintage Australian Floral Print, which has featured in my first Papillion Quilt. But being such lovely fabric I wanted to keep it uncut, so I’m excited to use it as the backing for this project.

 This quilt is up for sale on my madeit.com.au store which is called Netto. I’m hoping to complete some more quilts that I can add to my store over the next few months.


At this stage my store items are only available in Australia. However if you see something that you just lurve, let me know and I will investigate the postage and customs restrictions for your country to ensure that your quilt will reach you.

 I hope to show you another quilted project next month.